How To: Automate Data Extraction from Airtable Using GitHub Actions and R

Managing and analysing data across multiple tools can be inefficient. Airtable’s blend of spreadsheet and database features offers a flexible solution for organising and collaborating on data. Integrating Airtable with R enhances your workflow, leveraging R’s powerful data manipulation, analysis, and visualisation capabilities.
This guide demonstrates how to connect Airtable with R, enabling you to pull data into your R environment for analysis. It also covers automating this process using GitHub Actions, which schedules and runs tasks without manual intervention. Automation keeps your data current, reduces repetitive work, and allows you to focus on meaningful analysis. Additionally, GitHub Secrets securely stores credentials, further streamlining the process.
Airtable Setup
To connect to Airtable, you need the following IDs:
Personal Access Token: Log in to your Airtable account and navigate to the Account Overview. Go to the Builder Hub and select “Create token.” Follow the prompts to name your token, set its scope, and configure access rights. Once generated, copy and securely store the token, as it will only be displayed once. Avoid sharing this token with others. If necessary, you can regenerate personal access tokens in the future.

To find your Base ID, navigate to your Airtable base and examine the URL. The Base ID is the alphanumeric string that follows “app” in the URL. For example, in the URL https://airtable.com/appXXXXXXXXX. The Base ID is appXXXXXXXXX.
Table Name the table or view from which you want to pull data.
Basic R Script (Test Purposes Only)
You can connect to your Airtable table or view using the rairtable package in R, which simplifies the process. Alternatively, you can use the httr and jsonlite packages to manually pull data from Airtable, offering more flexibility for custom requests.
Basic Script: Use this script to test if your personal access token, base ID, and table name are correctly configured.
- Import packages.
install.packages("rairtable")

library(rairtable)- Update global variables to reflect your table (or view) name, base_id and personal access token. This is taken directly from Airtable.
TABLE_NAME <- "your_table_name" # Replace with your actual table name
PERSONAL_ACCESS_TOKEN <- "your_personal_access_token" # Replace with your actual personal access token
BASE_ID <- "your_base_id" # Replace with your actual base ID- Set your personal access token and table or view in Airtable, retrieve the data, and convert it into a tibble for further analysis.
#set your personal token
set_airtable_api_key(PERSONAL_ACCESS_TOKEN)

# Pull table
table <- airtable(TABLE_NAME, BASE_ID)

# Read data from Airtable
airtable_data <- read_airtable(table, id_to_col = TRUE, max_rows = 1000)
R Script with Secure Credentials in GitHub Secrets
The script above is helpful for testing but should not be shared publicly. A secure solution is to store your credentials in GitHub Secrets and access them using a YAML configuration file.
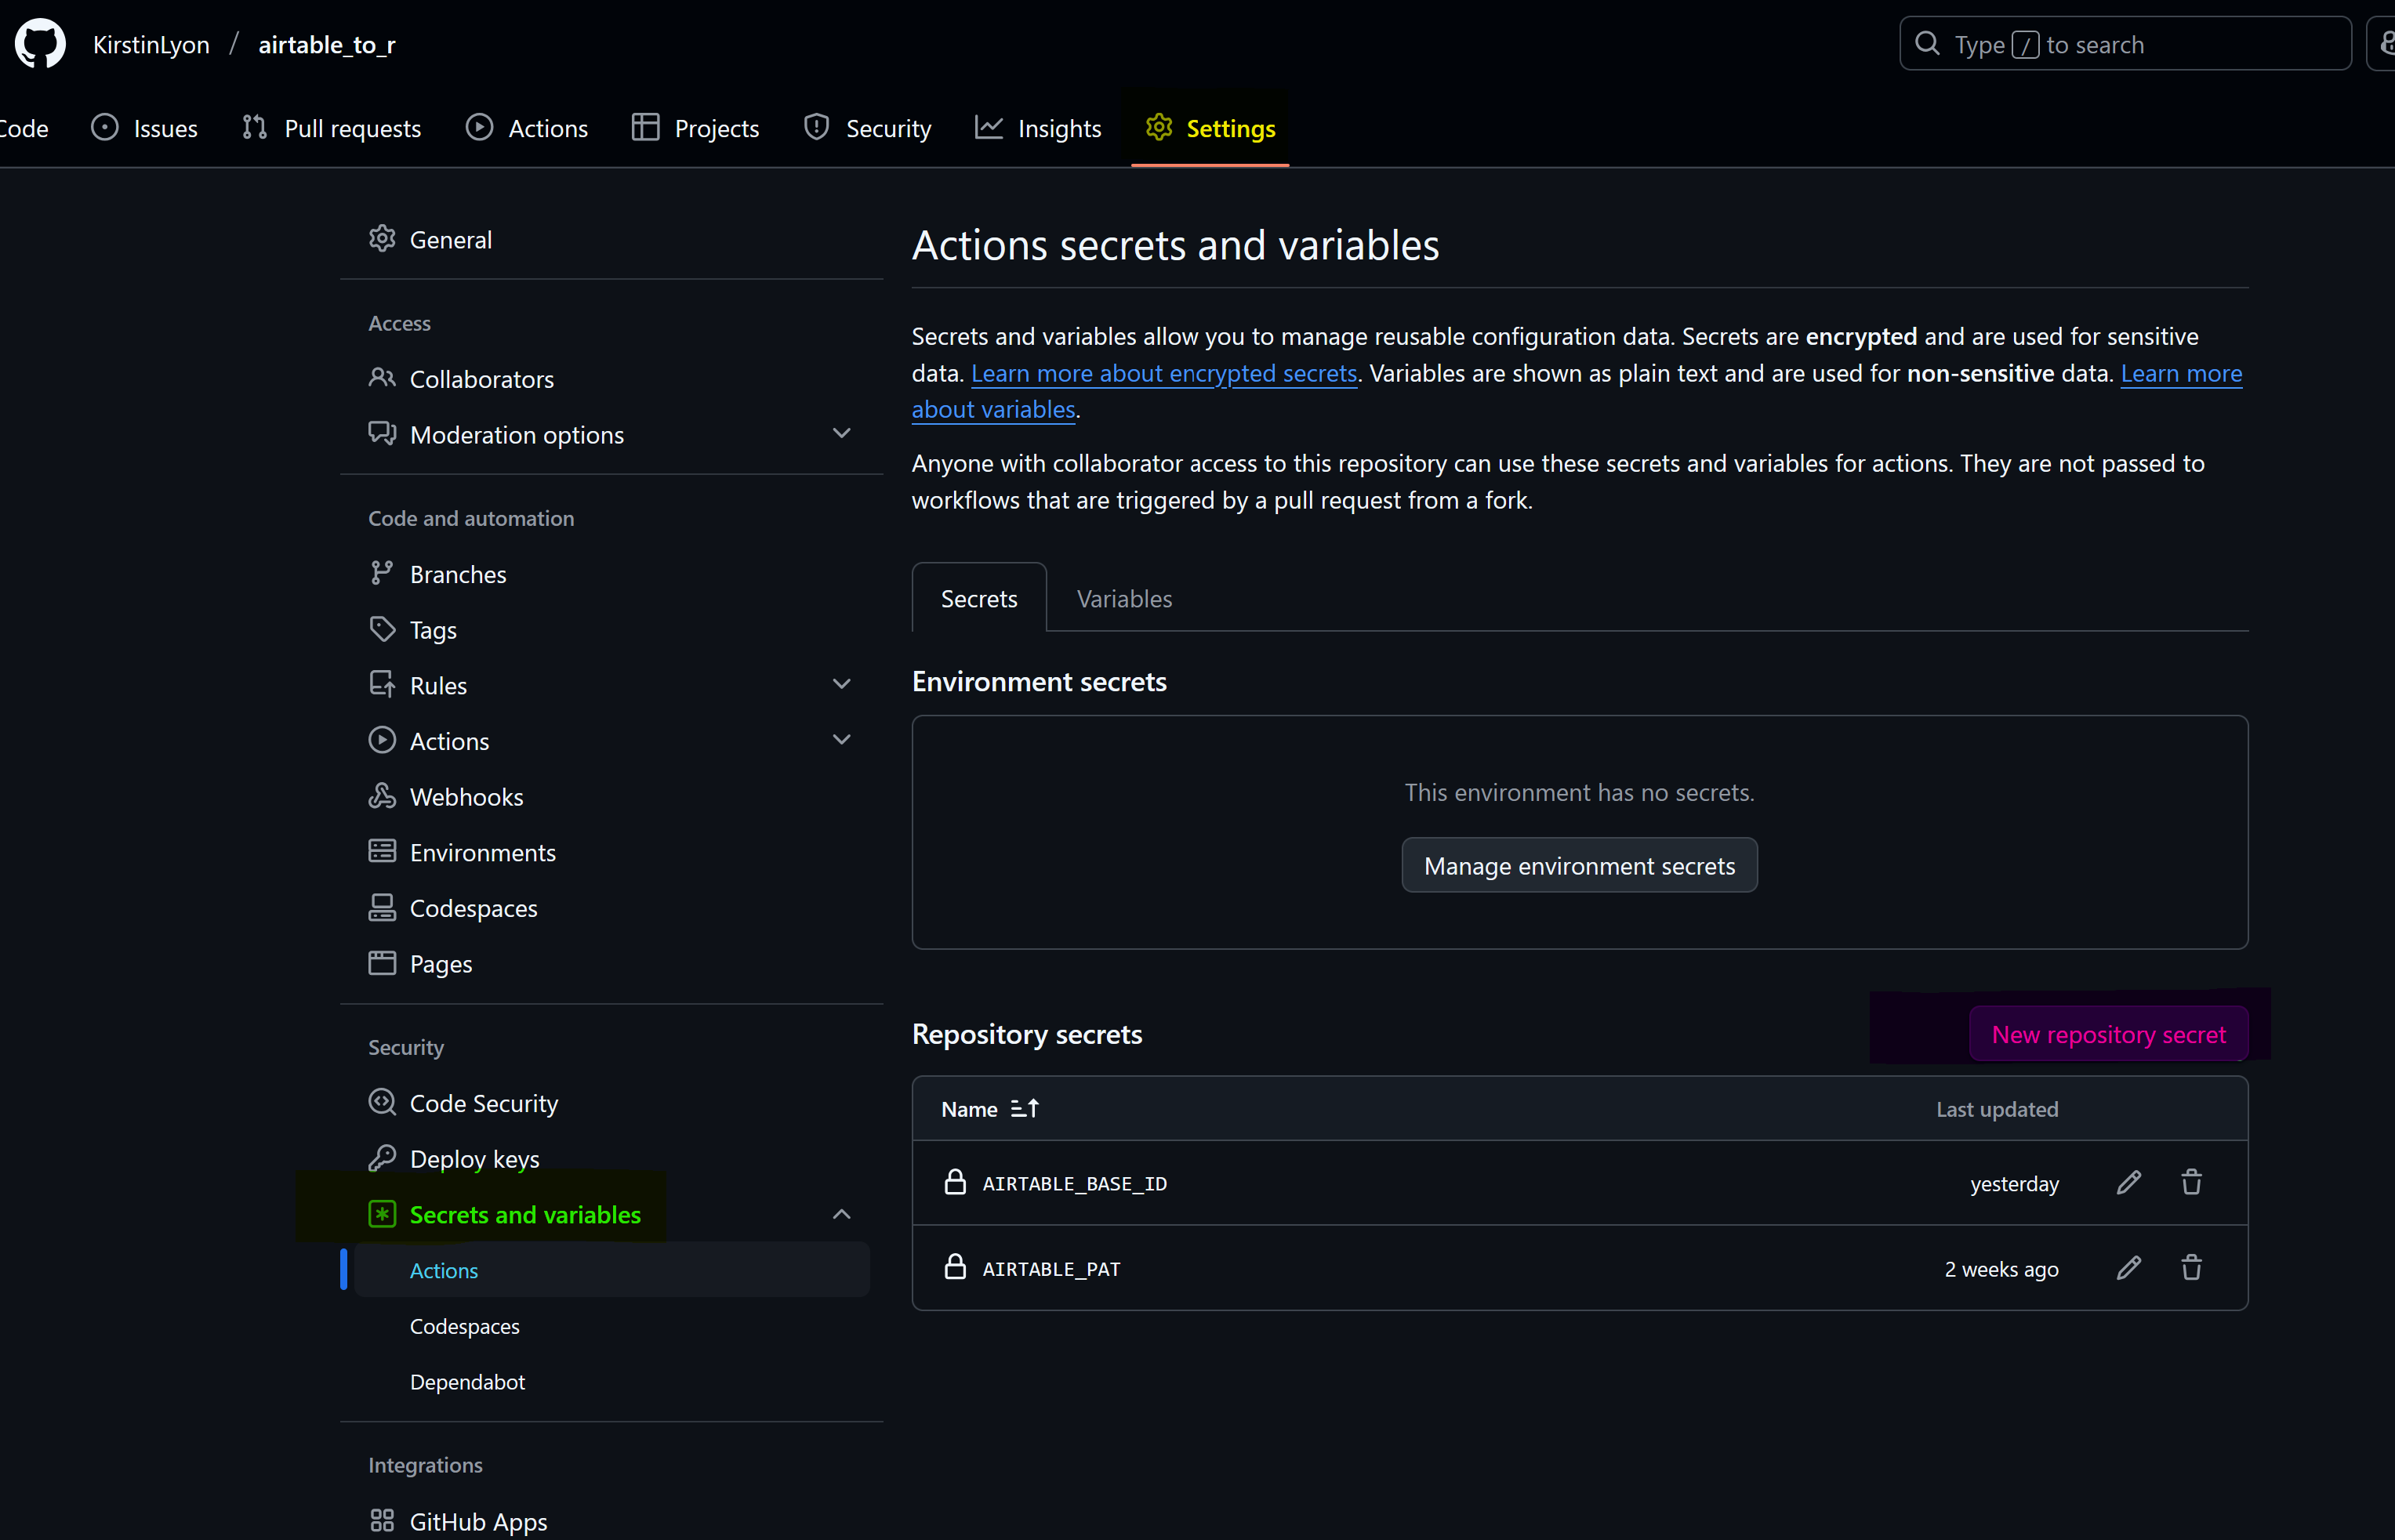
Add your access tokens as secrets to your repository
- Open your repository on GitHub, save your personal access token, and base your ID on GitHub. Settings (yellow) -> secrets and variables (green) -> Actions (blue).
- Create two new repository secrets (pink), name them, and add the token and base ID created by Airtable.
R Script
- Add libraries.
library(rairtable)
library(readr)- Set your credentials using the IDs stored in GitHub Secrets, which you configured earlier.
TABLE_NAME <- 'starwars'  # name of table in Airtable
PERSONAL_ACCESS_TOKEN <- Sys.getenv("AIRTABLE_PAT")  # personal access token stored in GitHub
BASE_ID <- Sys.getenv("AIRTABLE_BASE_ID") # base id of table in Airtable- Set your environment and then test if the API key exists.
# Set Airtable API key in environment
Sys.setenv(AIRTABLE_API_KEY = PERSONAL_ACCESS_TOKEN)

# Validate API key
if (PERSONAL_ACCESS_TOKEN == "") {
    stop("No Airtable API key set. Use `airtable_api_key()` to set your API key.")
} else {
    cat("Airtable API key is set.\n")
}- Pull data from Airtable with an automated script. Add error-catching and checks to make troubleshooting easier and ensure the process is smooth and reliable.
tryCatch({
    cat("Setting Airtable API key...\n")
    rairtable::set_airtable_api_key(PERSONAL_ACCESS_TOKEN, install = TRUE)
    cat("API key set successfully.\n")

    cat("Fetching table metadata...\n")
    data <- rairtable::airtable(TABLE_NAME, BASE_ID)
    cat("Fetched table metadata successfully.\n")

    cat("Reading data from Airtable...\n")
    all_data <- rairtable::read_airtable(data, id_to_col = TRUE, max_rows = 1000)
    cat("Fetched data successfully.\n")

    cat("Writing data to CSV...\n")
    # Need to include since it's being saved as an artefact
    write_csv(all_data, "Dataout/starwars.csv")
    cat("Data written to Dataout/starwars.csv successfully.\n")

}, error = function(e) {
    cat("An error occurred: ", e$message, "\n")
    stop(e)
})
Running the script above without the YAML script is not possible, as it will not fetch the GitHub Secrets and return an empty API.
Automate Script using GitHub Actions
Create the YAML file
- Create a New Folder in your local repository. .github.
- Create a Subfolder: Inside the .github folder, create another folder named workflows.
- Store YAML Files: Place all your YAML files inside the workflows folder.
- Create a text file in RStudio — rename to
.yml. Adding the .yml extension changes it to a YAML file.
The YAML Script
- Create a name for your workflow, grant write permissions (necessary for uploading data to GitHub), and set a schedule. Explore the various scheduling options on GitHub to find the best fit for your needs.
name: Run R Script with Airtable PAT

permissions:
  contents: write


on:
  workflow_dispatch:
  schedule:
- cron: '0 0 * * *' # Runs daily at midnight UTC- Set up the environment, install system dependencies, set up R, and install dependencies.
jobs:
  fetch_data:
    runs-on: ubuntu-latest

    steps:
    - name: Checkout repository
      uses: actions/checkout@v2

    - name: Install system dependencies
      run: |
        sudo apt-get update
        sudo apt-get install -y libcurl4-openssl-dev pkg-config libjpeg-dev libpng-dev

    - name: Set up R
      uses: r-lib/actions/setup-r@v2
      with:
        r-version: '4.2.2'  # Use a stable R version

    - name: Install R packages
      run: |
Rscript -e 'install.packages(c("httr", "jpeg", "png", "rairtable", "readr"), repos="https://cloud.r-project.org", dependencies=TRUE)'- Create a folder on GitHub for storing data. Ensure the dependencies match the libraries used in your R script. Verify that your .gitignore file doesn’t block CSV files or the Dataout folder from being pushed to GitHub.
- name: Create Dataout directory
      run: mkdir -p Dataout

- name: Clean Dataout directory
run: rm -rf Dataout/* # Optional: Clears the directory before running the script- Check secrets have been set and return messages to confirm.
- name: Debug PAT secret
      run: |
        if [ -z "${{ secrets.AIRTABLE_PAT }}" ]; then
          echo "AIRTABLE_PAT is not set."
          exit 1
        else
          echo "AIRTABLE_PAT is set."
        fi

 - name: Debug BASE_ID secret
      run: |
        if [ -z "${{ secrets.AIRTABLE_BASE_ID }}" ]; then
          echo "AIRTABLE_BASE_ID is not set."
          exit 1
        else
          echo "AIRTABLE_BASE_ID is set."
fi- Run your R script and configure the environment to access GitHub Secrets.
- name: Run R script
      run: |
        Rscript Scripts/airtable_and_r_github.R
      env:
        AIRTABLE_PAT: ${{ secrets.AIRTABLE_PAT }}
AIRTABLE_BASE_ID: ${{ secrets.AIRTABLE_BASE_ID }}- Upload data as an artifact in GitHub Actions. Alternatively, you can push the data to a database or a visualisation project or access it using the GitHub API for further use.
- name: Upload artifacts
      uses: actions/upload-artifact@v4
      with:
        name: data-output
        path: Dataout/
Trigger the workflow
The workflow will run each midnight, but it can be triggered manually.
- To trigger the workflow, go to Actions (yellow) in your repository, find the workflow (green) you want to run, and select it.
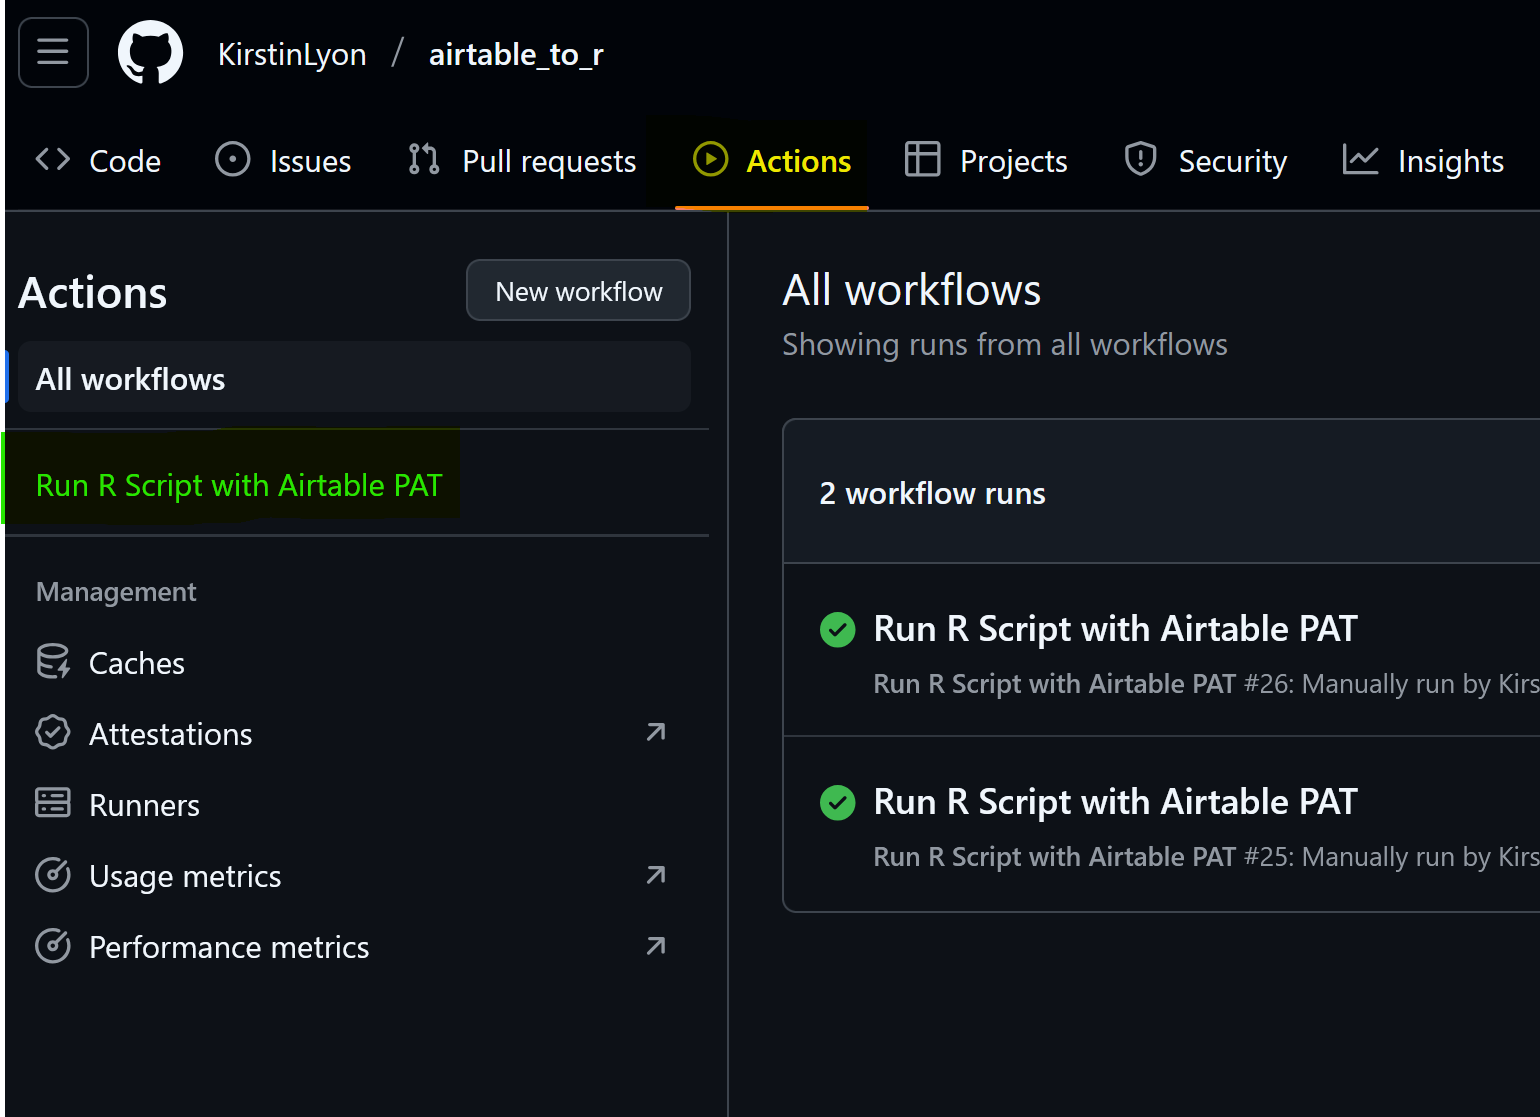
- Select run workflow (yellow) and choose a branch.

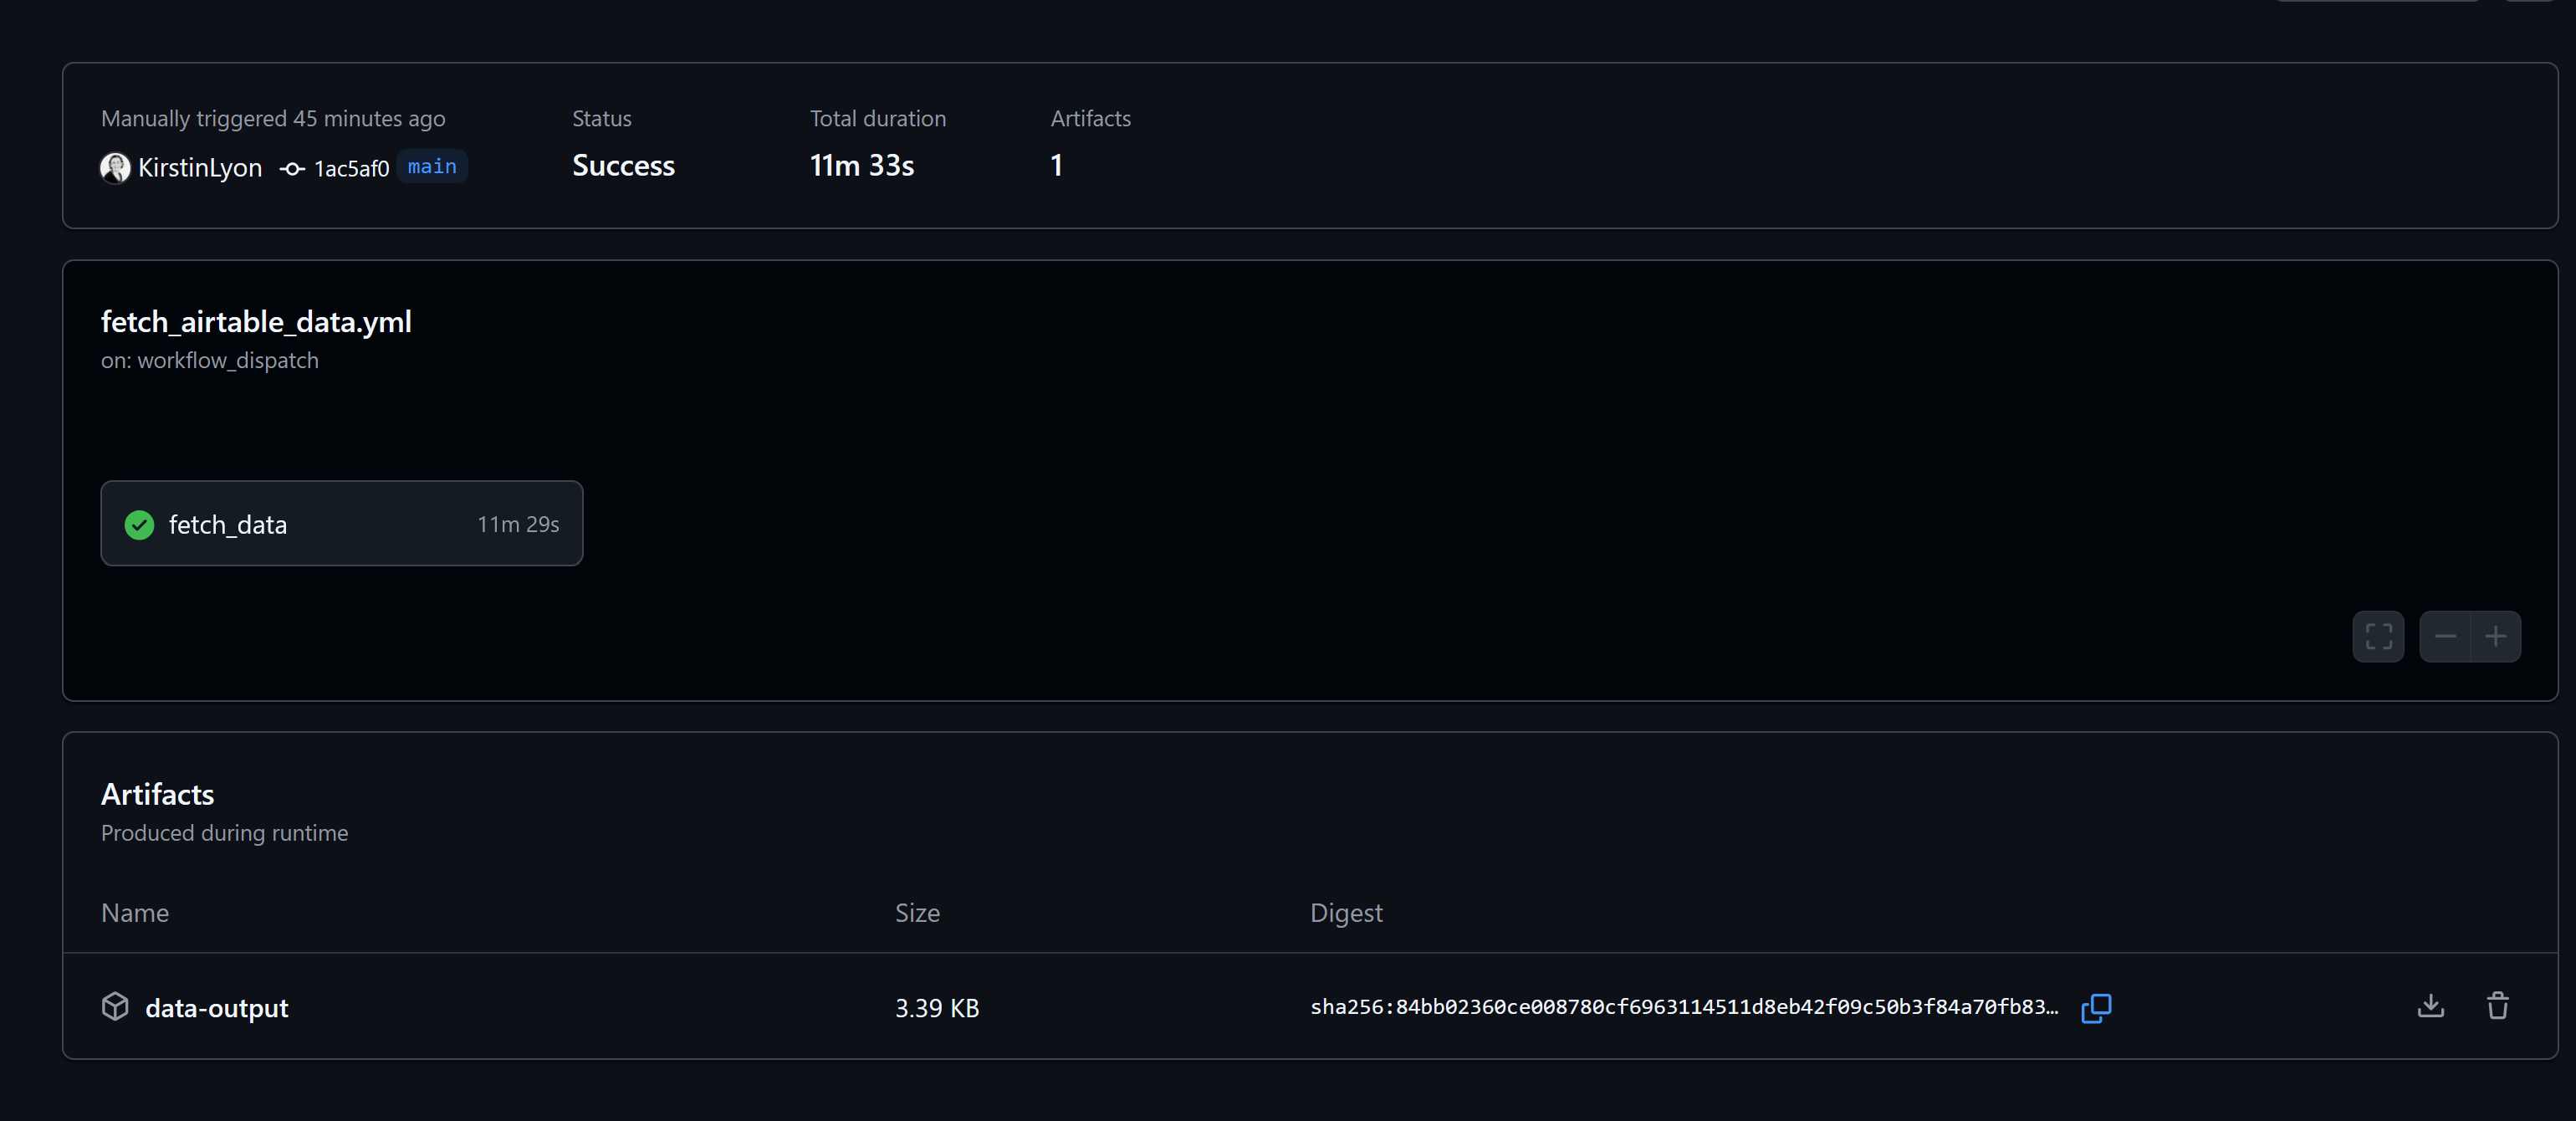
- The data is stored as an artifact when the workflow runs successfully. To download the data, click on the artifact link.
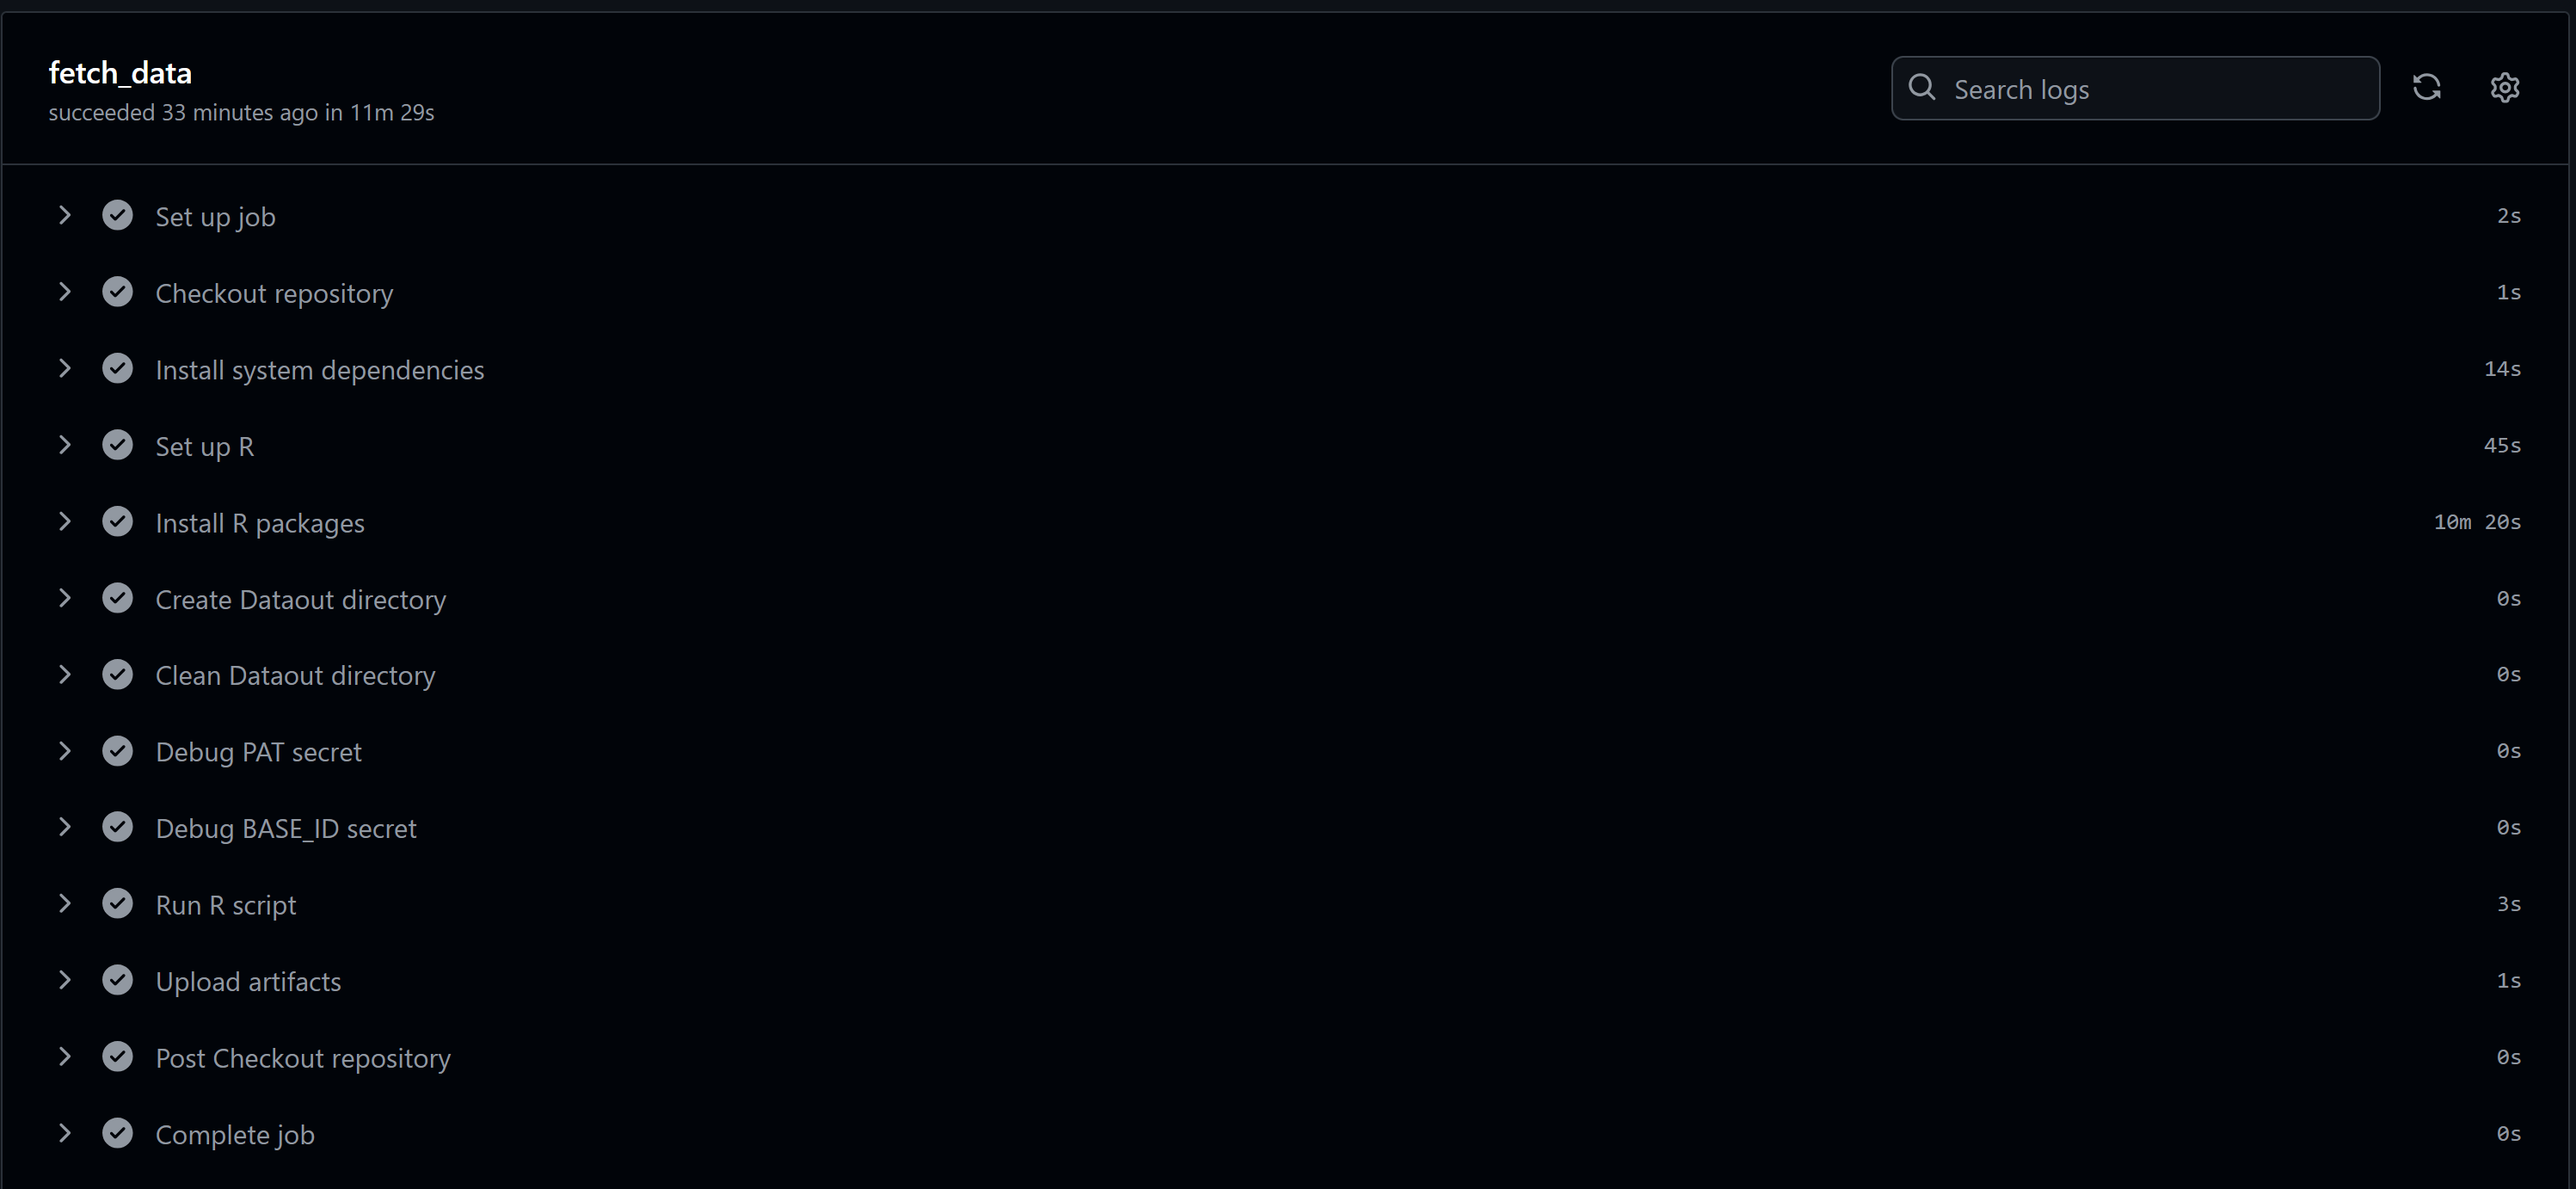
- To view all the steps in your workflow, click on the workflow name (highlighted in green). Clicking any of the links will display messages generated at that stage.
This walkthrough guides you through connecting to Airtable using the rairtable package in R, emphasising secure credential management by storing your Airtable API key in GitHub Secrets. You enhance security by accessing the Personal Access Token and Base ID through environment variables in your R script. Additionally, the guide demonstrates how to automate the workflow using GitHub Actions, allowing you to schedule data retrieval and updates at desired intervals. This automation ensures your data remains up-to-date without manual intervention, enabling you to focus on analysis while maintaining data synchronisation and reducing repetitive tasks.
Links
Automating R Scripts to Fetch and Process API Data with GitHub Actions